
 Move stud areas from the divider to within every bureau before you lift it into spot; and drill leeway gaps for the mounting screws.
 Leeway gaps, which are a similar measurement as the screw, guarantee that the bureau will be attracted tight to the divider by the leader of the screw. Measure cautiously and measure twice. Drill the gaps in the upper and lower balancing rails of the cabinets (the two even bits of wood along the top and base of the rear of the bureau).
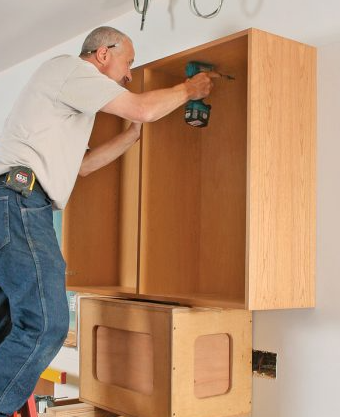
Set the principal divider bureau on the record strip and 1/4-inch away from its reference line on the divider; secure the top and base of the bureau to the divider with 3-inch-long #10 bureau screws.
Cozy up the screws as you go, yet don't fix them totally. You'll return later for a last fixing of the considerable number of screws after cabinets are lined up with one another, consolidated with screws and plumbed.
In the event that you have a partner, have her hold the unit set up while you secure it with screws. In case you're working alone, cut a few lengths of timber and make a V-formed indent in one end. Utilize these pieces as supports by setting the indent against the base of the bureau and wedging the timber up to hold the bureau set up. Put a cloth or bit of cardboard over the bureau where the indented wood will go to ensure the bureau's completion.
Position the second bureau on the record and close to the introduced bureau. Append it with screws as you did the first.
Get the two cabinets together with two cinches, situated around 1/4 of the good ways from the top and base.
Utilize wooden screw or short bar cinches with cushioned jaws that won't deface the cabinets. As you fix the clip, guarantee that the face, top, and base of the two casings are for the most part entirely flush.
Drill freedom openings through the face outline, countersinks so that the screwheads will be flush with or beneath the surface, and pilot gaps in the abutting cabinet.
Find the openings at the pivot positions so when the pivots are introduced, the screwheads will be hidden. The least demanding approach to bore these openings is at the same time, utilizing a movable mix bit.
Drive 2 1/4-inch drywall screws into each gap and expel the braces.
In the event that the gaps are not appropriately measured or in the event that you overdrive the screws, they can without much of a stretch snap off. Utilize the best possible bits and alter the grip on your drill/driver to restrain the torque.
Introduce the rest of the divider cabinets along this divider in a similar way and afterward expel the record.
In the event that the arrangement requires a filler strip at a specific area, clip it to the face outline and connect it as you would join two cabinets together.
Beginning at the corner, plumb the cabinets utilizing the reference line on the neighboring divider and a 2-foot level, and addition shims as required.
Introduce shims behind the bureau at the base or top as showed until the bureau is plumb and the best possible good ways from the reference line. Retreat an establishment screw, embed the shim until the bureau is plumb and drive in the screw. At the point when all cabinets are plumb, trim off the shims.
Correspondingly complete the establishment of cabinets first on connecting dividers and afterward different dividers.
Cinch the filler strip set up and drill 3/16-inch pilot openings through the cabinet face casing and filler strip, utilizing a countersink bit to break the screw head into the face outline. Secure the strip with 3-inch drywall screws.
Reinstall the entryways and check every one for smooth activity.
Be cautious while redriving the screws for the pivots. The screws are commonly produced using a genuinely delicate metal, which makes the heads simple to strip and the poles simple to snap off.